
You want to turn the room in your head into a three-dimensional, photorealistic image you can show your family or your contractor, so everyone understands exactly what you're going for. That's what a 3D interior design rendering is for. But right off the bat you hit a wall - 3D interior design, 3D rendering, render image, what's the actual difference between these terms? Which tool should you even use?
This article clears all of that up. We'll first nail down the terminology, then talk about how to choose an online 3D tool, walk through how a rendering gets made step by step, and finally point out an expensive blind spot - plus how getting the order right saves you a huge amount of rework.
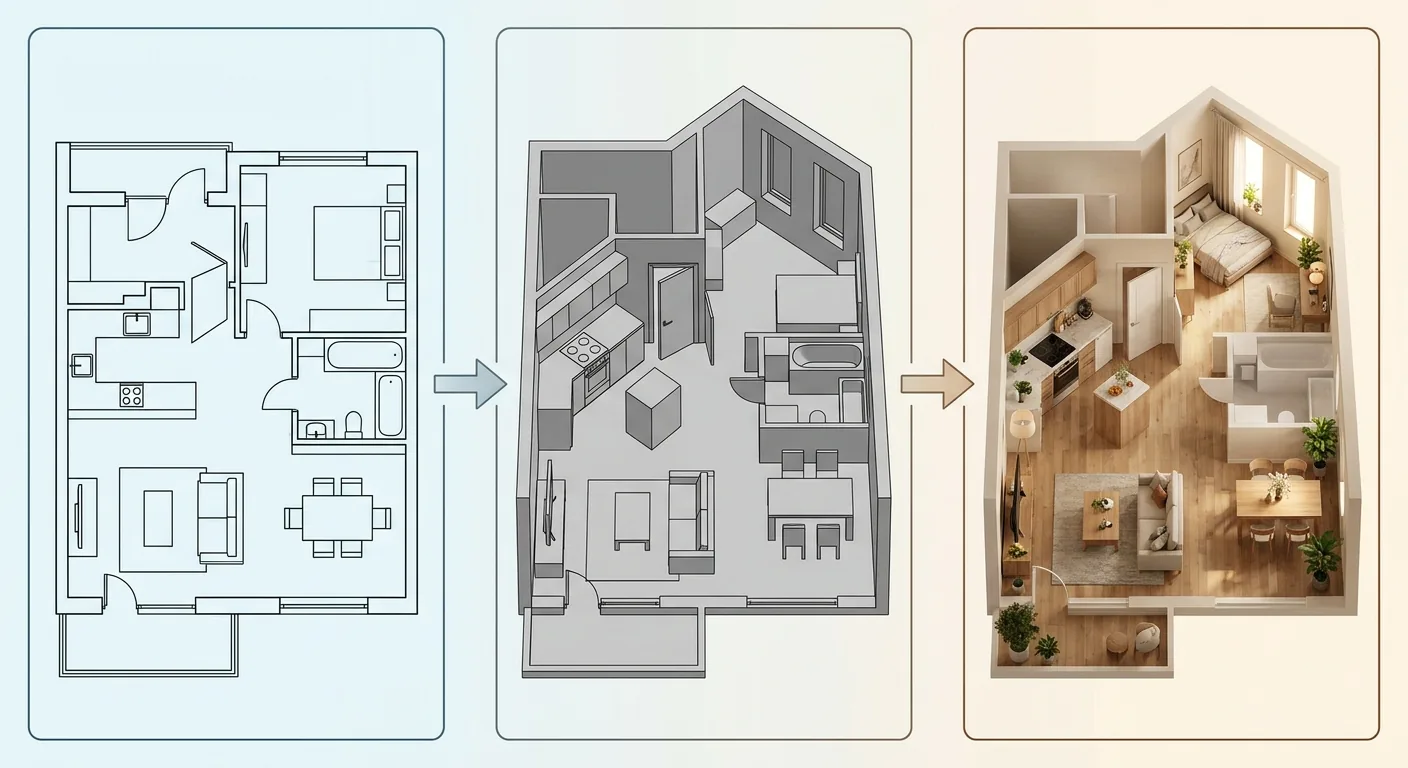
Caption: The three stages of a 3D rendering - 1. Floor plan (locks in dimensions and layout) to 2. 3D model (builds the volume, places furniture) to 3. Render (applies materials and light, outputs a photorealistic image)
Key takeaway: Within the 3D rendering market, architectural visualization holds the largest share, at 41.9% (Mordor Intelligence, 2026). No matter how photorealistic a rendering is, it can't cover up dimensions that were placed wrong from the start - nail the dimensions on a 1:1 floor plan first, then render, and you'll save time.
1What's the Difference Between a 3D Interior Design Rendering and a 3D Rendering? Getting the Terms Straight First
Many people treat "3D interior design" and "3D rendering" as the same thing, but there's actually a difference. 3D rendering is a large market, and within it, architectural visualization alone holds a 41.9% share (Mordor Intelligence, 2026), with several distinct outputs underneath that category. Get the terminology sorted first, and choosing tools and talking about workflow later won't get confusing.
Defining 3D Interior Design, 3D Rendering, and Render Images - and How They Differ
In one line each:
- 3D interior design image: a broad term for any "three-dimensional presentation" of a space - it might just be a gray model, or it might already have materials applied.
- 3D rendering / render image: specifically a finished image with materials and lighting applied, aiming for photorealism - it's the most refined type of 3D image.
So a render image is a subset of 3D images - it's the final, most polished stage.
Floor Plan, 3D Model, and Render Are Three Stages of the Same Workflow
These three aren't three unrelated things - they're three stages of the same workflow, just like the diagram above:
- Floor plan: a top-down layout diagram that locks in dimensions, room configuration, and door and window openings.
- 3D model: pulls the floor plan into three dimensions, places furniture, and applies basic materials.
- Rendering: applies lighting and renders, outputting a photorealistic finished image.
Each stage builds on the last, and the foundation is the floor plan.
When Do You Actually Need a 3D Rendering, and When Is a Floor Plan Enough?
You don't need to spend time on a rendering every time. The rule of thumb is simple:
If you need to communicate "mood" and "style" with family, a designer, or a contractor, a rendering is genuinely useful - one image is worth a thousand words. But if you just need to nail down dimensions, arrange the layout, or confirm whether furniture fits, a floor plan is enough, and it's a lot faster. Get clear on what you actually need first, so you don't burn hours on an illustrative image you didn't need. If you just want to settle on a style direction first and align on "what mood are we going for," a mood board will save you more time than jumping straight into a rendering.
2How to Choose an Online 3D Interior Design Tool: Browser-Based Options
Making a 3D interior design image today doesn't require installing bulky desktop software - online tools are getting stronger all the time. Browser-based options are growing fast, with web-based solutions like WebGL posting a growth rate as high as 27.55% (Mordor Intelligence, 2026). No installation, works across devices, and it's friendly to beginners. But online and desktop tools each come with trade-offs - think it through before you pick.
Online (No Install) vs. Desktop Software - Who Each One Suits
The difference between the two paths is clear:
- Online tools: open your browser and go, no install, no need for a high-end graphics card, syncs across devices. Good for beginners, light usage, and anyone who wants a quick output.
- Desktop software: powerful, high render quality, fine-grained control, but demanding on your computer and has a steep learning curve. Good for professionals, freelancers, and anyone who needs to output large photorealistic images.
Online 3D Interior Design Tool Capability Comparison
Once again, judging by capability is more useful than judging by brand name. Using three axes - ease of use, built-in model library, and render quality - here's how common online tool types stack up:
| Tool Type | Ease of Use | Built-in Model Library | Render Quality | Best For |
|---|---|---|---|---|
| Drag-and-drop layout tools | High | Rich | Medium | Beginners, quick layout work |
| Online modeling tools | Medium | Moderate | Medium-High | Those who want to model themselves, with some basics |
| Cloud rendering tools | Medium | Depends on import | High | Photorealistic output, can wait for render time |
The Trade-Off in Choosing a Tool - Easy to Use vs. Photorealistic Output, Hard to Get Both
Here's a hard trade-off: tools that are easy to pick up usually render more plainly; tools that can output photorealistic large images tend to have a steeper learning curve. It's hard to have both.
So don't chase "one tool that does everything." Get clear on what you actually need this time, then pick the tool that matches. Whichever one you pick, they'll all help you "make it three-dimensional" - but whether the dimensions are correct is something you still need to check separately, which is exactly the blind spot the next section covers. To see which AI tools pair well with 3D work, check out Which Tools Should You Use for 3D Renderings.
3The 3D Rendering Workflow: From Floor Plan to Photorealistic Render
Making a 3D rendering follows three fixed steps, but the one most often skipped is the very first. Generative 3D content is advancing fast, but the 2025 GenSpace spatial benchmark found that mainstream image-generation and modeling models still show a "significant gap" in metric measurement and spatial relationships (GenSpace, arXiv, 2025). So the dimensions in that first-step floor plan need a human to check - you can't hand that entirely to the tool.
Step 1: Start With a Correct Floor Plan (Dimensions, Layout, Openings)
The first step - and the foundation - is having a floor plan with correct dimensions, locking in the layout, furniture positions, and door and window openings.
This step determines everything downstream. If the floor plan's dimensions are wrong, no matter how refined the model and render get afterward, you're just making the wrong thing look prettier. This is the step beginners skip most often - jumping straight into modeling, only to discover halfway through that the walkway isn't wide enough or the furniture doesn't fit, forcing a total redo.
Step 2: Build the 3D Model, Place Furniture, Apply Materials
Once the floor plan is right, move to step two: pull it into three dimensions, place furniture, and apply materials.
This is where "the foundation starts looking good." You watch the room go from flat to three-dimensional, furniture gets placed piece by piece, and walls and floors get swapped into different materials. This step decides "what it looks like," but it doesn't change "whether the space itself is correct."
Step 3: Light and Render, Output a Photorealistic Rendering
The last step: apply lighting, render, and output a photorealistic finished image. The angle, color temperature, and intensity of the light determine the entire mood and realism of the final image. Rendering can take anywhere from a few minutes to a few hours, depending on the tool and the complexity of the scene.
Once it's done rendering, you have a beautiful finished image. But beautiful doesn't mean usable - that's the focus of the next section.
4The Blind Spot in 3D Renderings: You Can't Tell By Eye Whether Proportions and Clearances Are Right
The biggest blind spot in a 3D rendering is that it chases "looking real," not "being measured correctly." The GenSpace benchmark makes this point directly: mainstream models, including Stable Diffusion and FLUX, frequently fail to maintain correct proportions between objects (GenSpace, arXiv, 2025). A render only takes whatever was placed wrong at the start and paints it more convincingly.
No Matter How Photorealistic, a Render Can't Cover Up Dimensions That Were Wrong From the Start
The render's job is to "make things look real" - not to "check whether your dimensions are correct."
So if you placed a sofa too large or left an aisle too narrow at the floor-plan stage, the render won't warn you about it - it will simply, faithfully, beautifully present that mistake. The more photorealistic the image, the easier it is to mistake it for "this must be right."
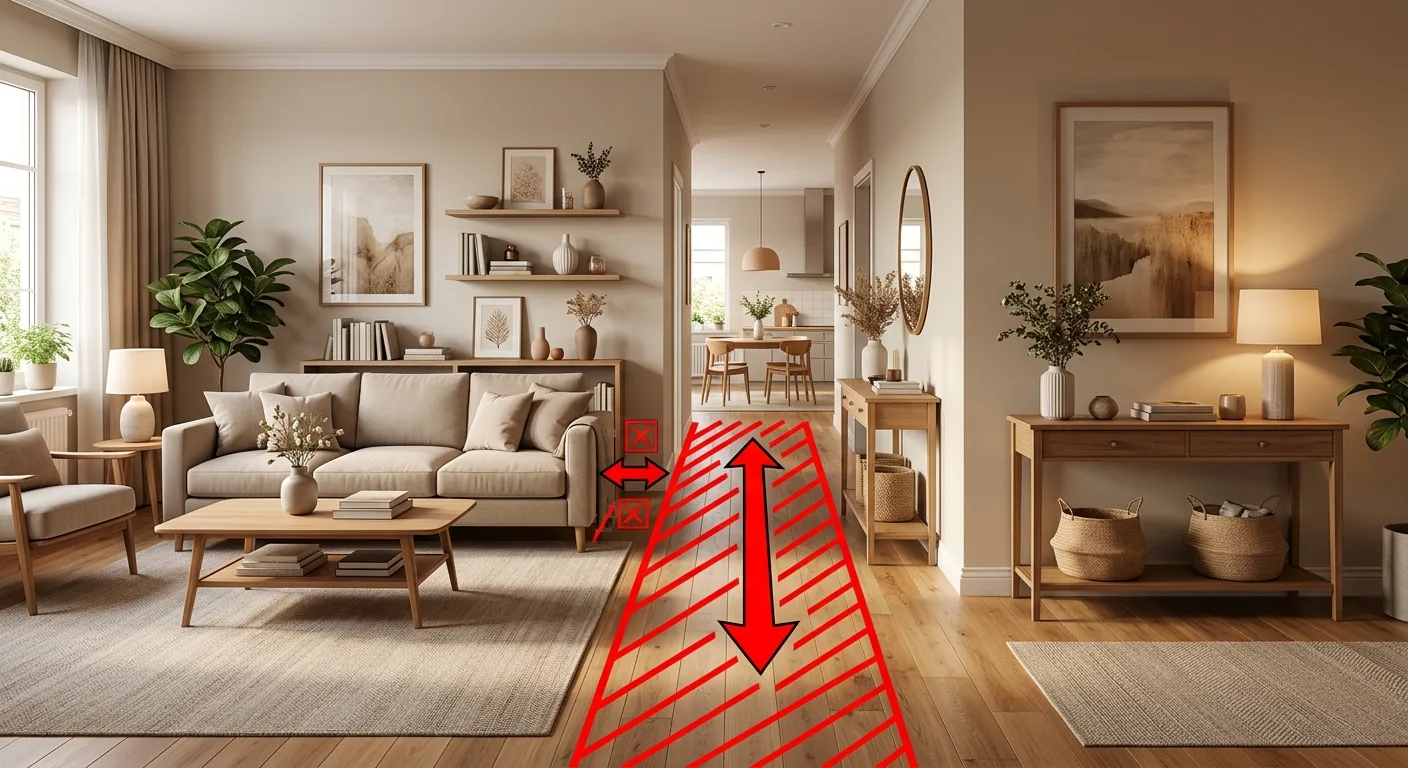
Caption: A render can look perfectly harmonious while the walkway is actually too narrow and the sofa-to-wall gap too tight - problems that are very hard to spot by eye on a beautifully lit render
Walkway Width, Door Swing Clearance, and Furniture Spacing Are Hard to Judge by Eye in a Render
Specifically, the three measurements most often overlooked in a render are: walkway width, door swing clearance, and the spacing between furniture. On a photorealistic image, these are almost impossible to judge by eye.
We've actually measured against real dimensions and compared them to renders, and a walkway drawn at 50 cm is a common occurrence - it looks perfectly fine in the image, but in real life someone has to turn sideways to get through. To get your walkway width and clearances actually right, see How Wide Should a Walkway Be and How Much Furniture Clearance Do You Need.
Re-Rendering Over and Over Costs a Lot of Time - It's Cheaper to Fix the Problem at the Source
3D rendering is very time-intensive. Once you discover the dimensions are wrong, you have to go back, fix the model, fix the floor plan, and re-render from scratch - round after round, each one a wait.
So the smart move isn't to catch mistakes at the rendering stage - it's to get the dimensions right at the very first stage. Fixing the problem at the source is the most cost-effective approach.
5The Time-Saving Habit: Nail Your Dimensions on a 1:1 Floor Plan First, Then Render in 3D
The key to saving time is getting the order right: place first, then render. Web-based rendering solutions are growing fast, up to 27.55% annually (Mordor Intelligence, 2026), making rendering more and more convenient - but convenient doesn't mean you can skip getting things right first. Lock in your dimensions on the floor plan up front, and you won't have to keep going back and forth once you're in the 3D stage.
The Correct Order - Nail Dimensions on a True 1:1 Floor Plan First, Then Move Into 3D
The correct production order is:
- Place it right first: use true 1:1 scale to arrange furniture, walkways, and traffic flow on the floor plan, confirming that people can walk through, doors can open, and it's actually buildable.
- Then render: once the base plan is locked in, move into 3D to build the model, apply materials, and render.
This way, when you get to the 3D stage, you're working from a base plan where "the dimensions are already correct," instead of worrying about sizing while you render.
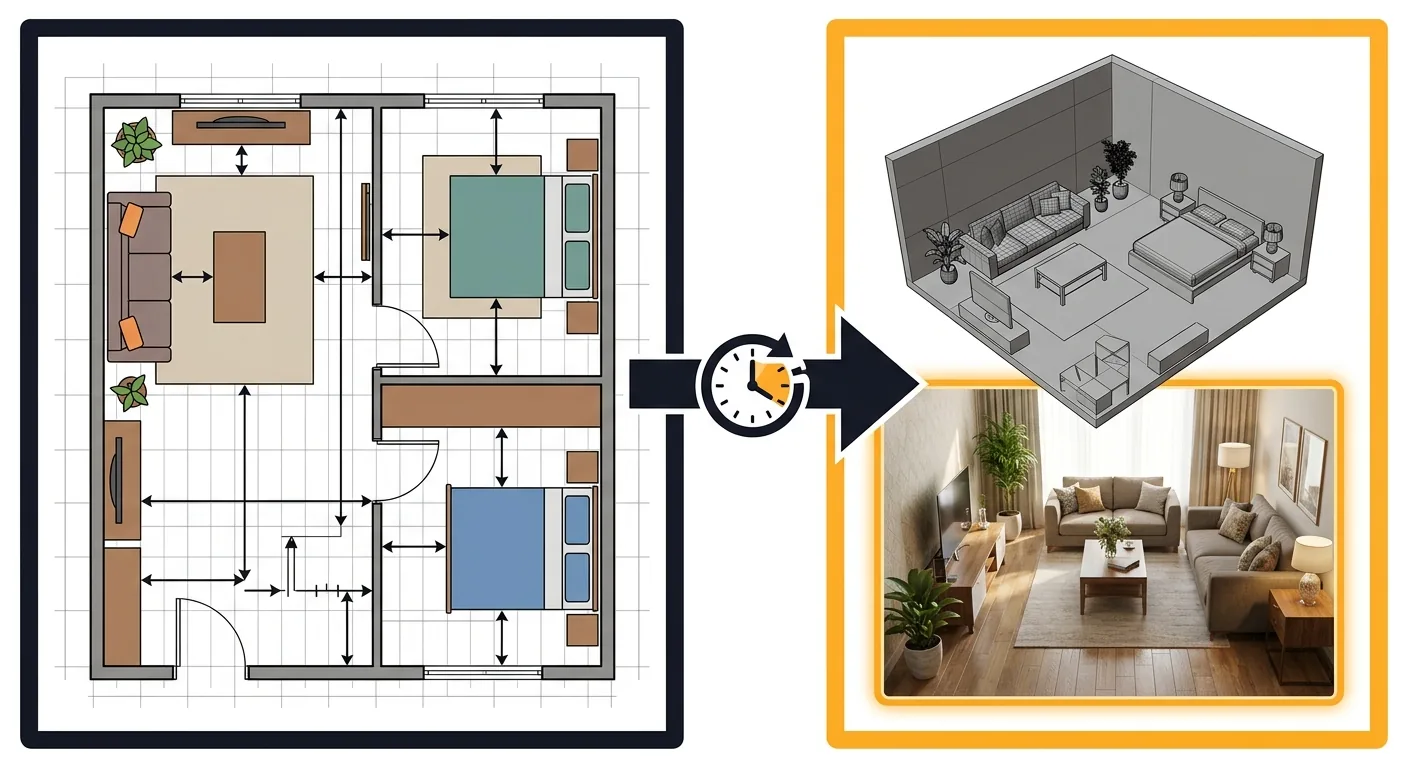
Caption: The time-saving order - 1. First place furniture and walkways correctly on a true 1:1 floor plan (dimensions locked in) to 2. Then move into 3D to build and render, so the rendering lands in one pass without going back to fix dimensions
Roomfit Handles the Dimension Base Plan - It's Not a 3D Rendering Tool
Let's be clear about Roomfit's role here so there's no confusion. It's not a 3D modeling tool, and it's not a rendering tool - what it does is that very first step: placing furniture into your home's floor plan using true, real-world centimeters.
You upload your floor plan, drag furniture in, and it displays everything at true 1:1 scale, automatically labeling clearances and snapping to walls. Whether the walkway is wide enough, whether a cabinet door will hit something when it opens, whether there's enough clearance beside the bed - you can see it clearly the moment you place it. It handles "getting the placement right," while the 3D tool handles "making it look three-dimensional and photorealistic" - the two work in relay. To fill in the fundamentals of floor plans and layout planning, see How to Do Floor Plans and Layout Planning.
Lock In the Base Plan First, Then Render - Less Rework, Rendering Lands in One Pass
Locking in dimensions at the earlier floor-plan stage pays off in a very concrete way: you won't have to keep going back to fix dimensions once you're in 3D, and the render lands in one pass, saving you a large amount of rework.
To get furniture dimensions right too, see How to Measure and Choose Furniture Dimensions. To understand the full AI-plus-3D workflow, go back to The Complete 2026 AI Interior Design Guide for the full picture.
6FAQ
What's the difference between a 3D interior design image and a 3D rendering?
A 3D interior design image broadly refers to any three-dimensional presentation of a space, which might be a gray model or might already have materials applied; a 3D rendering / render image specifically refers to a finished image with materials and lighting applied, aiming for photorealism - the most refined stage of a 3D image. The two are different outputs from the same workflow. Within the 3D rendering market, architectural visualization holds the largest share, at 41.9% (Mordor Intelligence, 2026), which shows how important three-dimensional presentation is in a professional workflow.
Are online 3D interior design tools any good? Do they cost money?
Online tools require no installation and work across devices, making them friendly to beginners, and web-based rendering solutions are growing fast at a 27.55% annual rate (Mordor Intelligence, 2026). Most offer a free tier to try, but often limit render quality or export resolution, with advanced features requiring payment. The trade-off is that easier-to-use tools render more plainly, while tools capable of photorealistic large images have a steeper learning curve - get clear on your needs first, then pick.
Can I hand a 3D rendering straight to a contractor to build from?
Not recommended. A rendering chases photorealism, not measurement accuracy - the 2025 GenSpace benchmark found mainstream models frequently fail on proportion and measurement. Walkway width, door swing clearance, and furniture spacing are very hard to judge by eye on a photorealistic image, and building directly from one risks running into dimensions that don't actually add up. Always go back and confirm against a true 1:1 floor-plan base plan before construction.
How do I avoid having to redo a 3D rendering over and over?
Lock in your dimensions at the earlier floor-plan stage. The correct order is to place furniture, walkways, and traffic flow correctly on a true 1:1 floor plan first, confirming it's walkable, operable, and buildable, then move into 3D to build the model and render. 3D rendering is very time-intensive - discovering a dimension is wrong means going back to fix the model and re-rendering, round after round of waiting - so fixing the problem at the source is the most time-efficient approach.
7Conclusion: Place It Right First, Then Render
A 3D interior design rendering can turn your idea into something three-dimensional and photorealistic - it's a great tool for communicating style. But it has a blind spot: it chases "looking real," not "being measured correctly." Get the dimensions wrong at the start, and rendering will only paint that mistake more convincingly.
So the time-saving, money-saving approach is to get the order right: use Roomfit to place furniture, walkways, and traffic flow correctly at true 1:1 scale first, confirm it's buildable, and only then move into 3D rendering for the beautiful final image. If you want to skip the wasted effort, place your dimensions right against your own floor plan with Roomfit first, then talk about rendering.