Wardrobes & Cabinets
The dressing room of your dreams usually fails on the same thing: the walkway is too narrow. The cabinets get packed in tight, and then a drawer can't even pull open without hitting the cabinet opposite — two people can't pass each other at all. A dressing room isn't made or broken by looks; it lives or dies on "is the walkway wide enough, does the cabinet depth actually fit." Dimensions come before aesthetics.
This article covers the minimum floor area for a primary bedroom dressing room, how much walkway width to leave, which of single-line, L-shape, or U-shape traffic flow suits which space, and how to place wardrobes within it. Finally, we'll show you how to lay out both the plan and the cabinet elevation together in Roomfit (roomfit.app), verifying walkway width and cabinet depth at the same true 1:1 scale in one pass. If you want to see the full five decisions in wardrobe planning first, go back to the System Cabinet / Wardrobe Planning Overview.
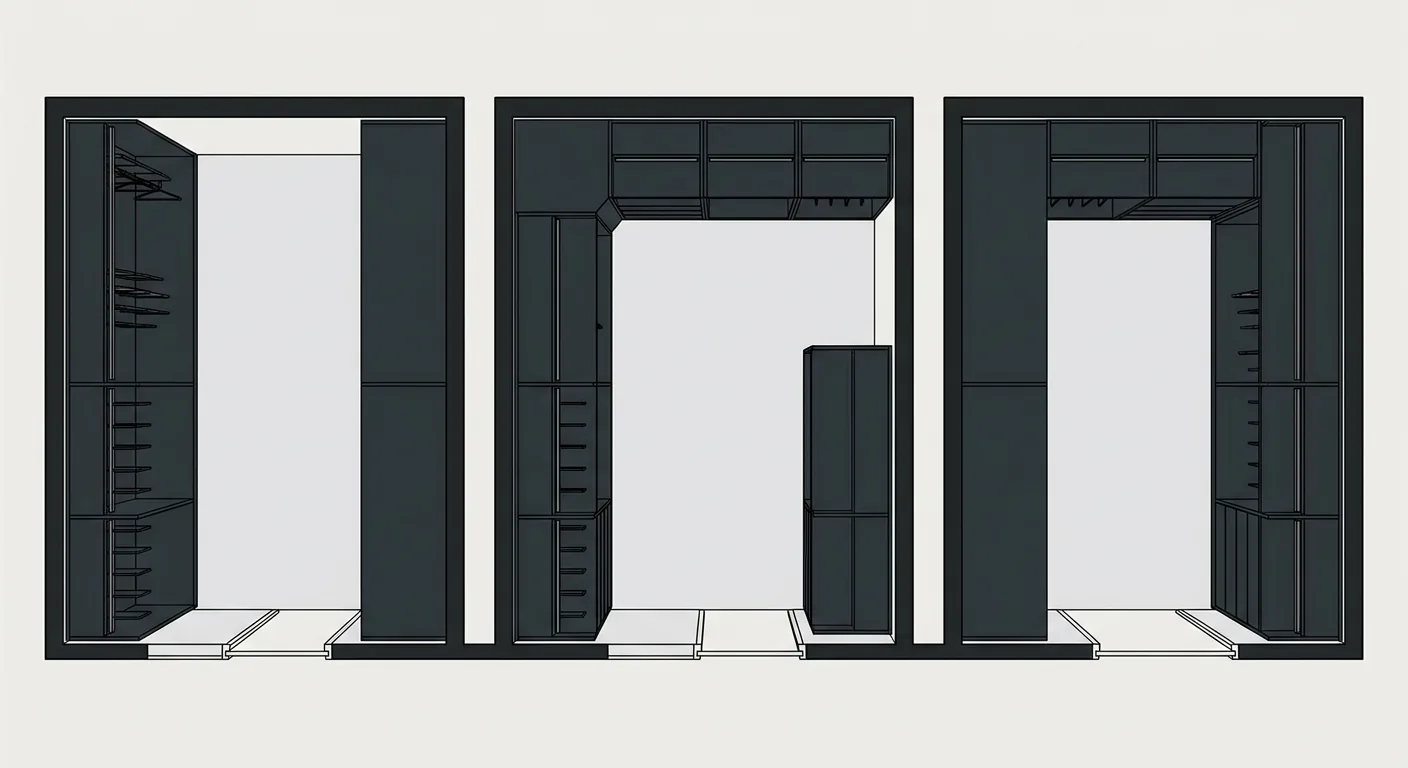
Caption: Three dressing-room traffic flow layouts from above — single-line (cabinets on one side, most space-efficient), L-shape (cabinets on two adjacent walls), and U-shape (cabinets on three walls, highest storage capacity but the most demanding on width)
Key takeaway: Taiwanese households are shrinking fast — the Ministry of the Interior's statistics show the average household size fell to 2.89 people in Q4 2025 (CNA, citing Ministry of the Interior statistics, 2026). Fewer people doesn't mean you can wing a dressing room — leave the walkway under 80 cm and even the most beautiful cabinets will get in your way every single day.
Let's answer the most practical question first: how big does it need to be to even work. A single-line dressing room (cabinets on one wall) can take shape at roughly 1–1.5 ping (about 3.3–5 m²) at minimum; an L-shape or U-shape layout with cabinets on two or three sides usually needs 2 ping or more (an industry rule of thumb — actual figures depend on on-site measurement). Force it into a space that's too small and all you get is a walkway you can't squeeze through.
Floor area is just the entry ticket — what actually decides whether it works well is the walkway.
Single-line is the most space-efficient approach — cabinets on one side, a walkway on the other — and it can take shape at 1–1.5 ping. This is also the most common dressing-room format for a smaller primary bedroom. If you want an L-shape or U-shape with cabinets on two or three sides, storage capacity goes up, but you'll need 2 ping or more to fit it in.
Taiwanese homes keep getting smaller — the average transacted floor area in Q3 2025 was about 31.5 ping (Ministry of the Interior statistics), which leaves very limited room in the primary bedroom for a dressing room. Rather than force in a U-shape you can't turn around in, a single-line layout with a smooth walkway is often the more practical choice.
The walkway is the lifeline of a dressing room. These are the numbers to remember:
Working backward from a 60 cm cabinet depth: a single-line layout needs a clear width of at least 60 + 90 ≈ 150 cm, while a U-shape needs 60 × 2 + 110 ≈ 230 cm or more. Have you ever actually calculated whether your own primary bedroom's clear width is enough? A lot of people only discover they're 20 cm short once they draw it out.
Each of the three layouts suits a different kind of space, and picking the wrong one either wastes space or tangles up your traffic flow. One rule of thumb: go single-line for a narrow, long space, and go L-shape or U-shape if you want maximum storage and have a wide enough space. The same logic applies to how you place wardrobes in a bedroom.
| Layout | Space Needed | Pros | Watch Out For |
|---|---|---|---|
| Single-line | Smallest, 1–1.5 ping | Most space-efficient, easiest to build | Least storage capacity |
| L-shape | Medium, about 2 ping | More storage, uses two adjacent walls | Corner creates a dead zone to handle |
| U-shape | Largest, 2 ping or more | Cabinets on three walls, maximum storage | Central walkway needs to be wide enough (100–120 cm) |
Single-line suits a narrow, long space — cabinets on one side, walkway on the other — the most space-efficient and easiest to build. L-shape uses two adjacent walls for more storage, but the corner creates a dead zone that needs handling (a rotating fitting or corner shelf). U-shape puts cabinets on three walls for maximum storage, at the cost of needing a wide enough space and making sure the central walkway stays at 100–120 cm.
A dressing room isn't isolated — it needs to connect to your daily routine. It's best placed between the primary bedroom's bed area and the bathroom, forming a smooth "wake up → get dressed → wash up" path, so you're not carrying an armful of clothes back and forth across your sleeping area.
This is the point we most often remind friends about when laying out a primary bedroom: no matter how packed the cabinets are, if you have to walk in a big loop every day just to reach them, you'll get sick of it eventually. How smooth the traffic flow is matters more to daily life than how much storage you have. You can pair the overall furniture placement and clearances in the bedroom with wardrobe sizing — see the Wardrobe Standard Dimensions Chart for the full width, height, and depth reference.
Dressing rooms mostly use open or semi-open cabinetry, and the elevation zoning follows the same principles as a wardrobe, but with extra emphasis on being easy to read at a glance. Leave 130–150 cm of clear vertical hanging space for long garments; a short-garment zone can use two stacked rods (each 90–100 cm) to double capacity; space folding shelves 30–40 cm apart; put drawers below waist height; and put seasonal items and luggage on the top shelf (within 180–200 cm off the floor, so they're still reachable). These are industry rules of thumb — actual figures depend on your own clothing and on-site measurement.
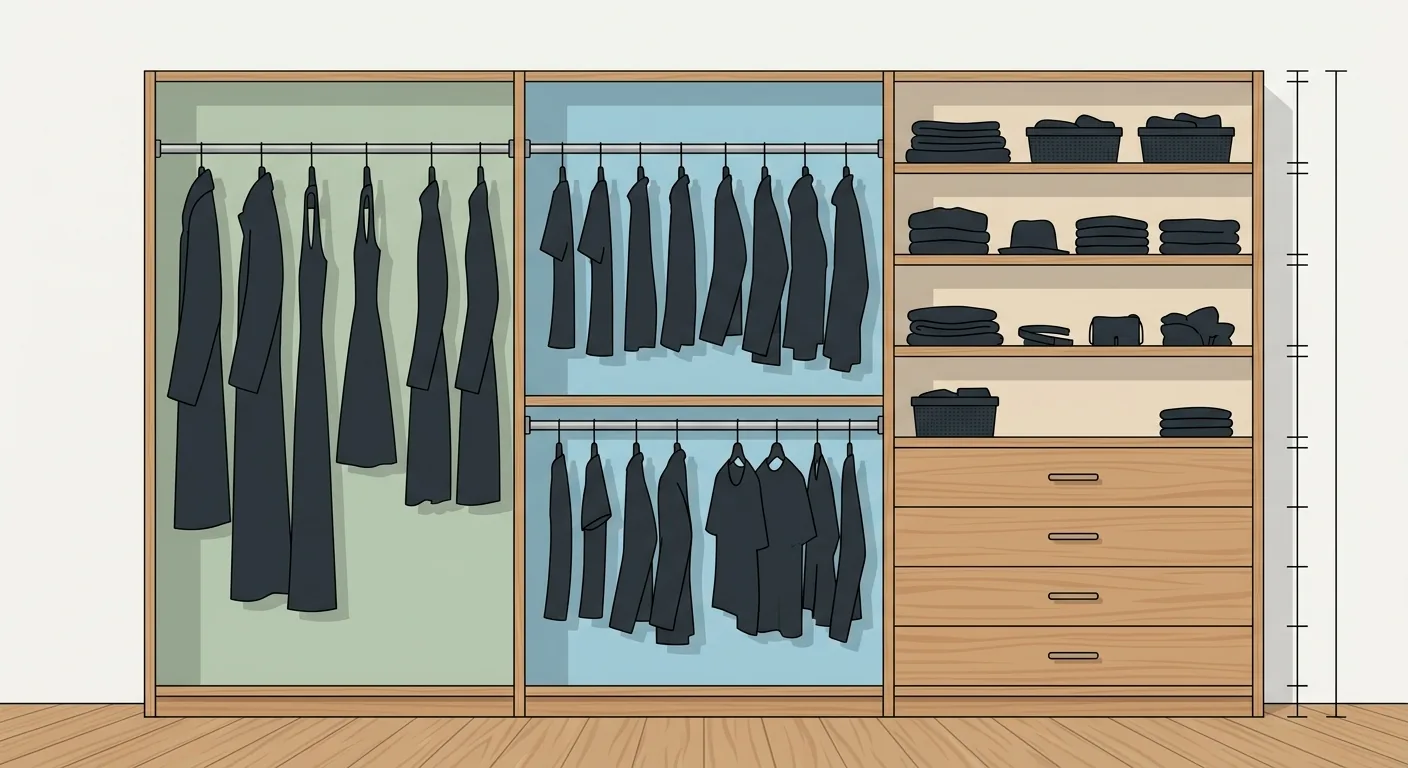
Caption: Dressing room elevation zoning — long-garment hanging 130–150 cm, short-garment double rods each 90–100 cm, shelf spacing 30–40 cm, drawers below waist height (industry rules of thumb)
Because an open dressing room shows its full contents, the tidiness of the zoning matters even more. The principle is the same as a regular wardrobe: put frequently worn items in the golden reach zone (70–160 cm off the floor), drawers below waist height for easy access, and seasonal or low-frequency items on the top shelf. We won't go into depth details here — for how to determine depth, see the Full Wardrobe Depth Guide with Hanging Rod and Shelf Reference.
A dressing room you can walk around and reach from both sides needs extra thought on zoning — which side gets everyday items, which side gets seasonal items. As you circle through the room, only a handful of spots end up being the most convenient.
L-shape and U-shape layouts will always run into corners. The inside of a corner is a dead zone your hand can't reach — a rotating fitting or corner shelf is the only way to reclaim it. The topmost 40–50 cm below the ceiling looks nice but is hard to reach, which makes it perfect for seasonal duvets and suitcases — low-frequency items.
These finishing details are hard to fully picture in your head, but obvious the moment they're drawn as an elevation — you can see at a glance where the dead zones are and where you can't reach.
The most common trap in a dressing room is "the cabinets get packed in tight, and then the walkway is only 60 cm left, and the drawer hits the cabinet opposite when you pull it out." These problems share one thing in common: walkway and cabinet depth get thought about separately. In Roomfit (roomfit.app), you can put both on the same 1:1 scale and verify them together.
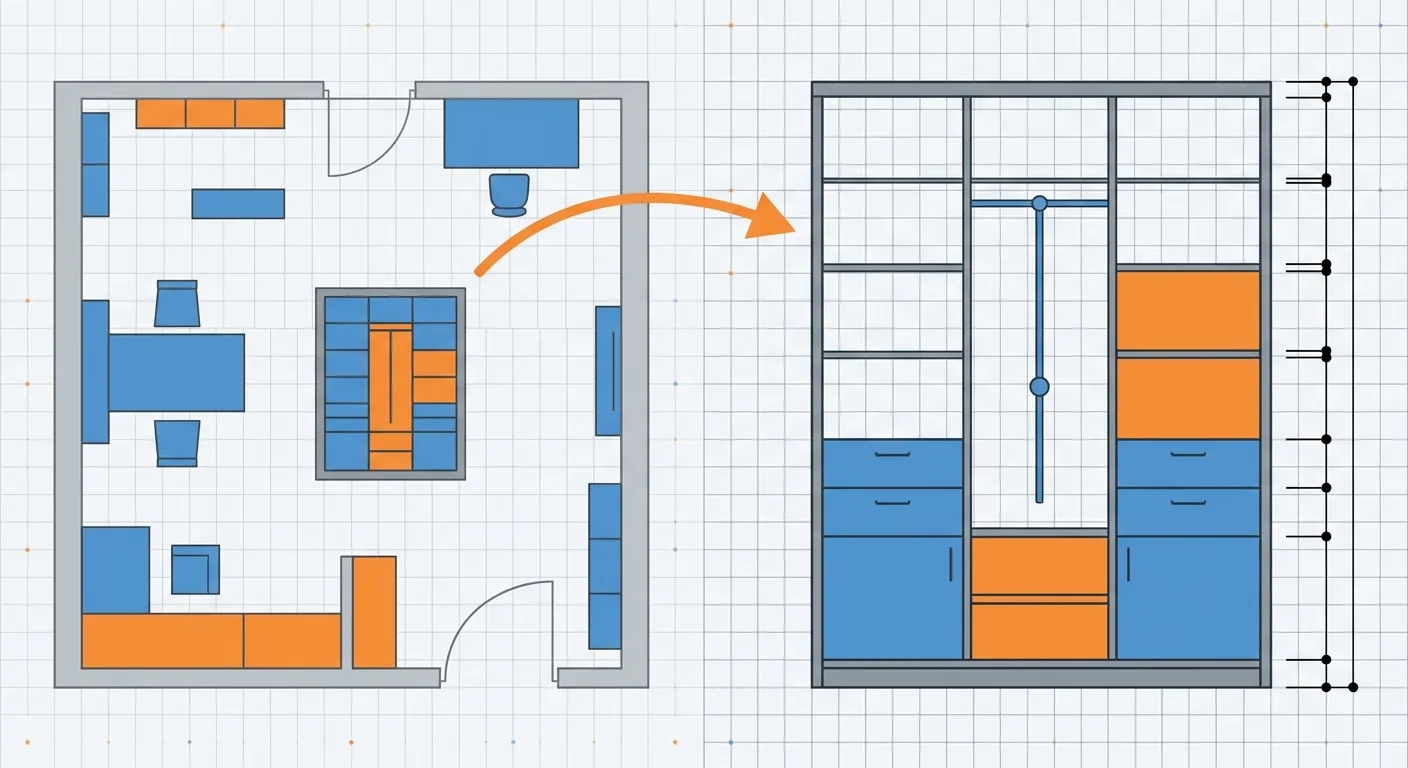
First lay out the cabinets on both sides plus the walkway in a 1:1 plan — the system automatically marks the clear walkway width and the turning clearance a drawer needs to open. Once the walkway checks out, switch to Cabinet Elevation Design to lay out the hanging rods, drawers, and shelves. If the walkway is too narrow or drawers collide, you'll see it the moment you draw it.
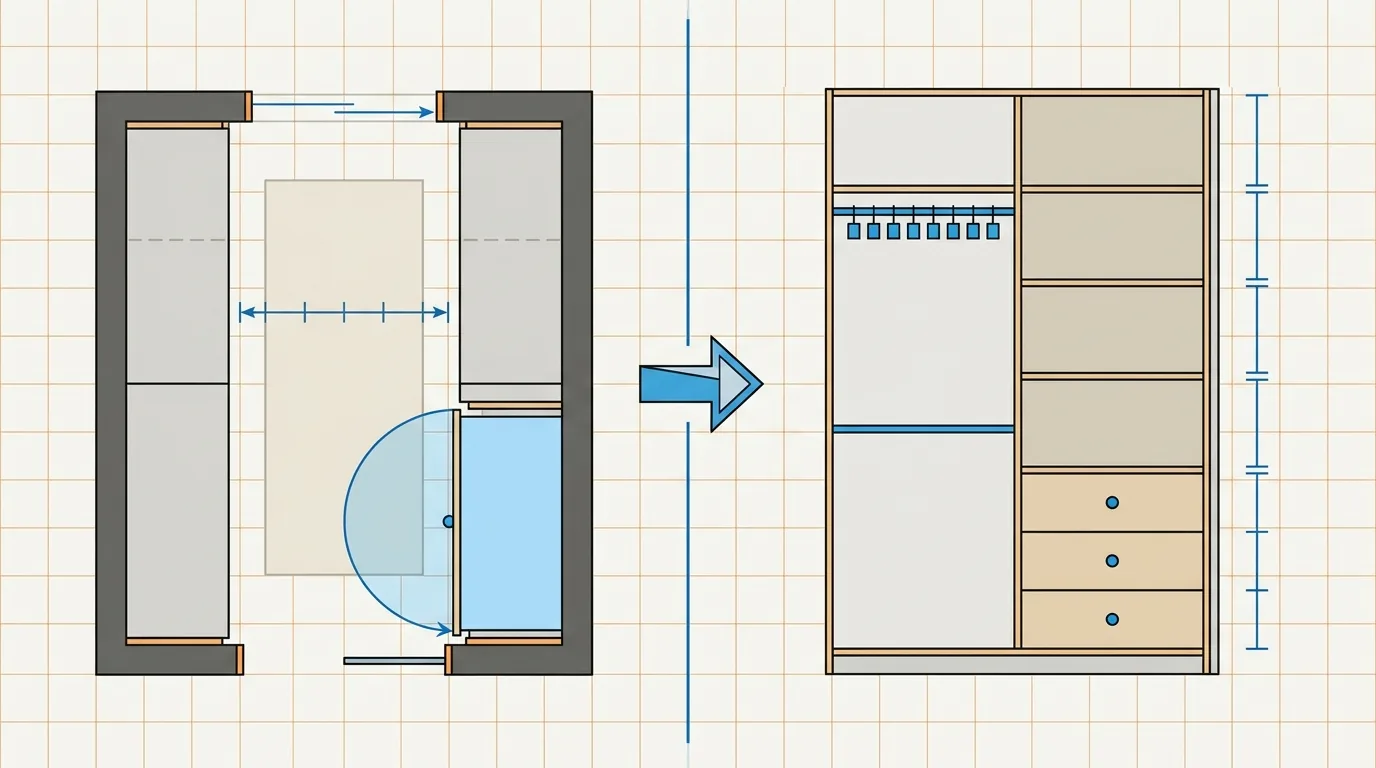
Caption: The plan on the left confirms the clear walkway width and drawer turning clearance first; the elevation on the right then lays out the internal cabinet divisions — walkway and cabinet depth on the same 1:1 canvas, so a too-narrow walkway shows up right away
Order matters: plan first, elevation second. The plan determines whether the walkway is wide enough and whether the traffic flow is smooth; the elevation determines whether the internal cabinet divisions are usable. Confirm the plan's walkway first, then move on to elevation details — otherwise you might get halfway through and discover the walkway has been eaten up by cabinet depth.
We once laid out a U-shape dressing room where all three sides were initially planned at 60 cm deep, but once we placed it on the plan, we found the central walkway was down to just 90 cm — too tight to crouch and open a drawer. Changing one side to a shallower 40 cm cabinet brought the walkway straight back up to 110 cm. You can see the result of this kind of trade-off the moment you adjust it on the plan.
The most practical part of the tool is that it flags a too-narrow walkway right on the spot, instead of making you find out with a tape measure after construction is done and regret it. How much turning clearance a drawer needs when it's pulled out, how much walkway is left between the two sides of cabinets — the numbers are all right there on the drawing.
Putting the walkway and cabinet depth on the same 1:1 canvas and verifying them together is the most direct way to avoid ending up with "a dressing room you can't turn around in once it's finished." For how system cabinet dimension limits and pricing are calculated, continue with How to Calculate System Cabinet Dimensions and Pricing.
A single-line dressing room (cabinets on one wall) can take shape at roughly 1–1.5 ping (about 3.3–5 m²) at minimum, and is the most common approach for a smaller primary bedroom; an L-shape or U-shape layout with cabinets on two or three sides gives you more storage but usually needs 2 ping or more (an industry rule of thumb — verify with on-site measurement). Taiwan's average transacted floor area was about 31.5 ping in Q3 2025, leaving limited room in the primary bedroom for a dressing room, so a single-line layout is often more practical than forcing in a U-shape.
For single-side access while standing, leave at least 80–90 cm of walkway; for cabinets on both sides where you need to crouch to open drawers or sliding doors, leave 100–120 cm in the middle. Working backward from a 60 cm cabinet depth, a single-line layout needs a clear width of at least about 60 + 90 = 150 cm, and a U-shape needs about 60 × 2 + 110 = 230 cm or more. The walkway is the lifeline of a usable dressing room — better to scale back the cabinets than to leave the walkway too narrow.
Choose single-line for a narrow, long space — cabinets on one side, walkway on the other — the most space-efficient and easiest to build; choose L-shape or U-shape if you want maximum storage and have a wide enough space (2 ping or more). L-shape uses two adjacent walls but has a corner dead zone to handle, while U-shape puts cabinets on three walls for maximum storage but needs a central walkway of at least 100–120 cm. Choosing wrong either wastes space or tangles up your traffic flow.
It depends on the space and your habits. Open shelving is easy to access and ventilates well, but clothes gather dust more easily and visible clutter has to be kept tidy; a door keeps things neater and dust-free, but adds the space and cost of a swinging door. Smaller homes often go open or use a curtain to save walkway space, while those who prioritize dust protection or have allergy concerns tend to prefer a door. There's no standard answer — match it to your own cleaning habits.
Lay out the plan first with a tool at true 1:1 scale. Place the cabinets on both sides and the walkway into the canvas at real dimensions, let the system mark the clear walkway width and the turning clearance a drawer needs, and confirm the walkway checks out before switching to the elevation to divide it. A too-narrow walkway or colliding drawers show up the moment you draw them — no need to regret it after construction. Using 60 cm cabinet depth as your baseline, the most direct check is confirming how much walkway is left after subtracting cabinet depth from the clear width.
The planning order for a primary bedroom dressing room is always walkway first, cabinets second. First confirm whether the floor area is enough and whether the walkway can be 80–120 cm, then decide between single-line, L-shape, or U-shape, and only then lay out the internal cabinet zoning. Get the order right and you won't end up with a beautiful dressing room you can't turn around in.
The most direct way to avoid "finishing it and not being able to turn around" is to put the plan's walkway and the cabinet elevation into the same 1:1 canvas in Roomfit and verify them together — a too-narrow walkway shows up and gets adjusted on the spot. To go back to the overall planning and see the five decisions, return to the System Cabinet / Wardrobe Planning Overview; for how to determine cabinet depth, see the Full Wardrobe Depth Guide with Hanging Rod and Shelf Reference.
Arrange furniture in your space at true 1:1 scale with Roomfit and see exactly how much walkway is left — no install, no sign-up.
Start with Roomfit →